Behold the Lamb Passover Web Supplement
 Passover Teaching-Picture Craft a.k.a. “Extreme Passover Craft”
For a detailed explanation of this craft and the reason why we do it, please read pages 50-51 of Behold the Lamb. See also page 13 of the Behold the Lamb Preparation Guide.
CAUTION: In addition to the images we have provided below to illustrate the steps for making the craft, we have also included images of the teaching-picture “sacrifice” to demonstrate how to use the craft during the ‘avodah.
Total Working Time: 1 to 2 hours
Drying Time: 8+ hoursThis craft works best in a two-day process. On the first day, complete steps one and two, and then finish the craft on the second day. Younger kids will need more assistance than older kids.
Getting Started
Materials Needed
|
• Dark corn syrup* |
• Wooden craft (popsicle) sticks |
* or Fast-food style hot sauce packets (optional substitute for corn syrup, food coloring, and sandwich baggies)
When to Make the Craft
These lambs take quite a while to make (mostly because the glue takes time to dry in several of the steps). They can be made whenever you would like, but should be completed at least one day before Passover. However, since Exodus 12:3 indicates that the children of Israel were to select a lamb on the tenth day of the first month (five days before Passover), this may be an ideal time to begin making the lambs. Each child can then keep their lamb during the days leading up to Passover, in anticipation of the sacrifice that is to come.
How to Make the Lamb Craft
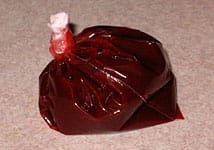 Step 1: Create a “blood” packet for the lamb’s body
(This step should be prepared in advance by an adult.)
Time to make: 15 minutes
Time to dry: 2-3 hours
In a small bowl, stir together one tablespoon of school glue with one tablespoon of water, and then add one tablespoon of dark corn syrup. Mix in 20 drops of red food coloring and one drop of green food coloring (blue will also work). Next, pour two tablespoons of the “blood” mixture into one corner of a plastic sandwich bag (not a thick, zip-top-style bag, but a thin, flip-top-style bag). Begin to twist the bag just above the liquid, making sure that all the air is squeezed out. Tie a knot in the bag, and cut off the extra plastic above the knot. Finally, dip the end of the knot in glue and allow to dry. Before going on to the next step, allow the packet to sit for a couple of hours, and then make sure there are no leaks.
Alternatively, you can use a fast-food style hot sauce packet in place of the homemade “blood” packet. While the hot sauce packets are easier, they are not as functional in the final step of putting the “blood” on the doors of the houses. The homemade “blood” paints well and looks much more realistic.
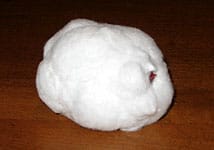 Step 2: Cover the “blood” packet with cotton balls
Time to make: 10-15 minutes
Time to dry: At least 4 hours (overnight is best)
Squeeze a generous amount of glue onto a plate or bowl. Take small cotton balls (or large cotton balls cut in half), dip them in glue and then apply to the “blood” packet, leaving only one small area uncovered. This uncovered area will be at the neck, just below the head, so that you will have a relatively easy spot to cut in the final step. While the glue is still wet, you can gently squeeze the body into the proper oval shape. If there are any spots of red still showing after the glue has dried, just glue a little more cotton to those areas.
NOTE: This step can be very messy. You will most likely end up with glue and bits of cotton all over your hands. To minimize mess (especially if you are doing this craft with multiple kids at the same time), give each child a paper plate on which to work.
 Step 3: Make the legs
(For younger kids, this step should also be prepared in advance by an adult.)
Time to make: 10 minutes
Time to dry: 30 minutes
Print out the Lamb Legs, Ears and Nose template. Cut out four black rectangles for each lamb you are making (one template will make up to three lambs). Roll each rectangle into a tube, periodically adding a small amount of glue as you are rolling. Allow legs to dry.
 Step 4: Attach legs
Time to make: 5-10 minutes
Time to dry: 2-3 hours
After the legs have dried, dip the end of each leg in glue and attach to lamb with a twisting motion. The cotton will wrap around the legs, adding to their stability. Place lamb on its back (with legs pointing up) and allow the glue to dry before attempting to stand it up. If the legs are too wobbly, you can add an extra bead of glue around each leg. Once the legs have dried, the lamb should be able to stand on four legs (if necessary, use scissors to trim legs to the same length).
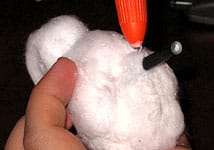
 Step 5: Attach head, ears, nose and tail
Time to make: 5-10 minutes
Time to dry: 1 hour
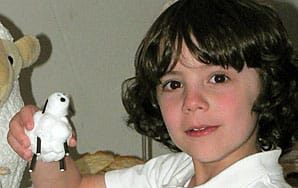
Select a well-formed, large cotton ball to use for the head. Glue this cotton ball to the lamb body, just above the small opening that will be cut. The head should just cover the opening, but not be firmly glued at this spot. If it does become fully attached, it is not a problem—you will just have to use a little more effort to cut the lamb open in the final step. From the Lamb Legs, Ears and Nose template, cut out two ears and a nose for each lamb. You can simply use these pieces of paper as your ears and nose, or use them as templates to cut the ears and nose from black felt. Finally, glue the googly eyes, ears, and nose to your lamb. You can also add a small black pom-pom or a strip of black felt for a tail. Your lamb is now complete!
How to Make the Coloring House with Doorposts Craft
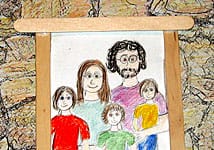 Step 6: Prepare a house with wooden doorposts
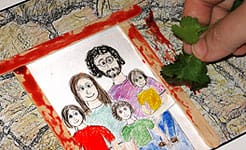
Print out the Stone House template, one picture for each child. Using crayons, colored pencils or markers, have each child color the picture however they would like, adding a drawing of their family in the open doorway. Next, glue a craft stick to each side of the doorway, creating the sideposts. Finally, put a dot of glue on the top of each sidepost and add a final craft stick across the top to make the lintel. Allow the glue to dry.
Alternatively, you can allow your child(ren) to make a complete house from a cardboard box, using their imagination to create and decorate it however they would like.
What To Do During the ’Avodah
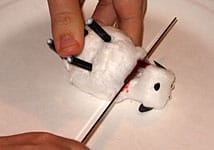
Step 7: “Sacrifice” the lamb, and apply the “blood” to the doorposts.
This is NOT a real sacrifice! It is only a teaching picture—nothing more.
(The cutting should be done by an adult.)
Have each child bring their lamb and house picture to the Passover ’avodah. During the ’avodah, when you reach the break in the text on page 18, take a few moments to “sacrifice” the lamb(s).
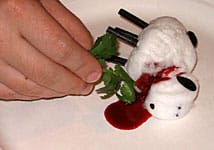
Place the lamb on a plate, and firmly slice across the bottom of the neck, into the bag of “blood”. Squeeze gently as you are cutting, so that the “blood” will spill onto the plate.
Then, using a piece of parsley or some other spreading device of your choice, allow each child to dip into the “blood” and spread onto the doorpost of his house. If you have more than one child at your ’avodah, you may ask one child to offer his lamb for the sacrifice, or each child can sacrifice his own lamb. Keep in mind that the “blood” from one lamb will only be enough to paint the doorposts of two to three houses. Encourage everyone participating in the ’avodah to observe the “slaughter,” as a vivid reminder of the true blood that has been shed on our behalf.